Getting Started!
ACCESS to
ONLINE Setup Guide
and VIDEO Tutorials
We've designed and easy to work with web template. Instructions on how to
modify specific elements of the template as listed (in short form) on this page
as well as a very detailed set of video instructions are included in the
Setup
Guide. The Quick Start Guide includes information to help you build your website
from beginning to end, with text and video instructions of two varieties!
Each aspect of building your website includes a quick 'reference' video, if you
just want to learn how to complete a task in under 3 minutes. And a Case Study
video, where our design team teaches you some very detailed tips and tricks for
modifying the look and feel of the template.
This package contains:
- your web site template in a self installing .exe file format
- Read_ME_First.pdf document (important information for reference)
- support_information.pdf (includes support info and product updates)
- Quick_Start_Guide.chm (your detailed help guide, with Instructor Led
Video Tutorials)
- FAQs.pdf (a growing list of frequently asked questions)
- customization_services.pdf (information and pricing for customizing the
color / theme for your template)
Just download, and click on the self installing file. Your files will
initially be added to your desktop. You can move them to another folder at any
point after installation.
We recommend that you 'save' a copy of the PDF files, and the Quick Start
Guide to the "My Documents" folder for easy reference.
Image Licensing Information:
The royalty free images used in this template are provided as a part of a
licensing agreement between (Getty Images / Jupiter Images / Bigstockphoto.com /
or Hemera Studios ) and Lucky Marble Solutions Corp / i3dthemes. If you wish to
purchase a larger version of the images for your own marketing use, please
contact our design team for image 'stock' number. For detailed information on
the image licensing please read the licensing.pdf document included in the
download package.
We highly recommend:
Source Files Included
This template was created using Macromedia Fireworks and Flash. Source files
are provided in PNG format. Photoshop .psd files are not available for this
template. You can download your source files from your members download page.
- Macromedia Fireworks .png files
- 1_background.png
- 2_index.png
- 3_template.png
- 4_elements.png
- 5_flash_header.png
- logo.png
- themed-image.png
- Macromedia Flash .fla files
- header.fla
- template_header.fla
- animations.fla
- flash-images.fla
- music.fla
- taglines.fla
- time-date.fla
Important NOTE for FrontPage 2000 / 2002 / 2003 users:
This template uses CSS-based layout which means that the page may not look
exactly as it does when previewed or viewed in an actual web browser. Older
versions of FrontPage use 'older' technologies in the design and preview modes
and we recommend that you always 'preview' your web page in an actual web
browser to see an actual representation of your web page.
This template uses TRANSPARENT PNG graphics for the logo, themed image, and
icons. As with CSS, FrontPage does not 'render' the PNG graphics in the design
window accurately. You would see a grey or white outline around these images.
This only happens in the design window. When you preview the page in your
browser, this effect will not be visible. We are using the most up to date
coding practices, some of which FrontPage was not designed to take advantage of
4-6 years ago.
The 'menu' buttons or 'navigation' that many of our FrontPage users have
grown accustom to, have been replaced with 'easier' to manage CSS Menu's. The
CSS menu's do not rely upon FrontPage extensions, and will not have any issues
if your web server looses it's FrontPage extensions. And they are far more
search engine friendly.
By offering these advanced coding techniques, your website will be easier to
update, fair much better in the search engines and be 'current' for years to
come.
Template Details
Can you customize the
template for me?
Yes, we offer a special customization service that includes modifying the
template color, and images. Please refer to the customization_services.pdf file
included with your download for up to date details.
Can I change the colors?
You can change the font colors by editing the stylesheet, or by modifying the
text directly on the page.
To modify the 'background' graphics or art work (also known as the 'template
interface') you would need to modify the source graphic files first using
Macromedia Fireworks. Then export your newly colored images to the graphics
folder in the template. Providing that only the colors have been modified, you
should be able to export in as a single action. In some templates you would also
need to modify the 'header.fla' and the 'template_header.fla' using a
combination of colorized .png files and flash .fla files. We do provide video
instruction in the Quick Start Guide for those wanting to learn how we build,
and modify our templates. This type of modification is best suited for
experienced graphic designers, and flashers or for folks wanting to learn some
new skills. The template source files are designed to be easily modified, but
this also depends on the level of experience of the person modifying them.
Depending on the template, and the degree to which you would like to modify the
color of the template will greatly influence the amount time and effort it will
take.
Different Page Layouts
This template includes 9 pre-designed pages and 3 different 'template' page
layouts you can use to create as many new pages as you need.
You can easily create a new page by opening one of the 'template' pages in
the 'Templates' folder:
- with the template page open in the design window
- click on the file menu
- select Save as...
- give the page a new file name (page_name.htm)
- click Save, and that's it
Once you've created a new page based on a template page, we also recommend
that you 'title' the page right away. You can title the page by right clicking
on it, selecting page properties, then adding your title to the 'Title' area in
the properties window.
Info boxes, and content areas
Many of our templates include 'graphical' information boxes usually located
in the side menu area's, and content boxes used in the main body of the web
page. You can create duplicates of the boxes, if you wish to have more than one
information box, or content area on the page. These boxes use a combination of
jpg images and CSS. You can copy an existing box, and paste below or above the
original. Just place your cursor inside the box and look for a '<div> tag
labeled #wrapper_content or #wrapper_message_box. Copy the entire div, and
paste to create a new information box.
Include pages for FrontPage / Library Pages for Dreamweaver
We've really made this template easy to update, as all pages that share
'common' elements such as the:
logo, themed image, icons, top links, vertical links, bottom links, site info
copyright
can be easily updated from one central location. The includes folder
for FrontPage, or the Library folder for Dreamweaver. Your include pages are
labeled. Just open the 'top links' page for example, make your changes and save.
All pages will be updated automatically. No need to go through each page and
copy and paste.
Website Name graphic
We've include a generic "Website name" transparent PNG graphic that we will
modify FREE of Charge.
We've also included detailed instructions in the Quick Start Guide that
demonstrate how you can:
- order your free text logo
- replace this graphic with your own logo graphic
- replace this graphic with text
- modify this graphic using Macromedia Fireworks (download link for 30
free trial version included)
You can easily modify the 'website name' graphic by simply opening the
includes / Library folder, then open the 'logo' page. Replace
the generic graphic on this page with your own graphic, or text and your web
pages will be updated. Detailed info check out the Quick Start Guide.
Contact form for servers with FrontPage Extensions, or PHP (version 4+)
We've included a contact page for use with FrontPage enabled servers for
FrontPage 2000 / 2002 / 2003 / Expression Web Designers.
For web servers that do not included FrontPage extensions, we've included a
PHP 'form handler'. All you need is PHP to be enabled on your hosting account,
and you can publish your web via FTP with a working form page. Just edit the
information in the 'process_form.php' page, instructions located at the top of
this page.
General Instructions:
With exception to the 'make a new web' instructions, the remaining
instructions in the list are very basic and brief. For detailed instructions
please refer to the Video Tutorials included in the Quick Start Guide.
- download your package
- double click to install
- your web template will be added to your desktop
- start your favorite editor
FrontPage /
Expression INSTRUCTIONS:
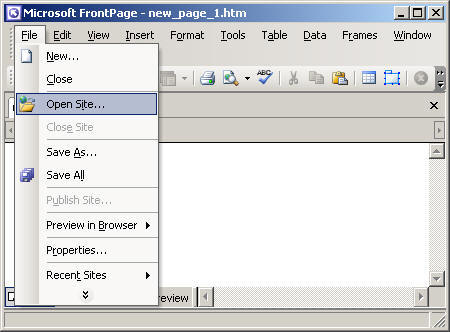
- start FrontPage / Expression Web Designer
- click on the File menu...
- click on Open Site/Open Web...
- browse to your installation folder
- select and open the *TemplateName_web* folder
- once you see the system folders:
_private
flash
images
Template...
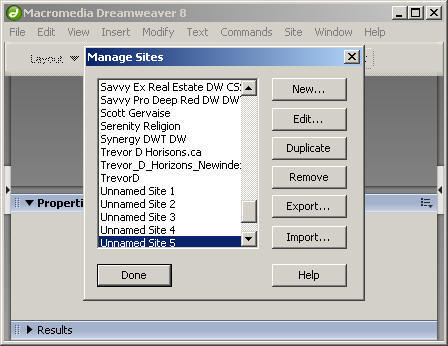
Dreamweaver
INSTRUCTIONS:
start Dreamweaver
- click on the Site menu (top row of buttons)
- click on "Manage Sites" menu
- click on the "New..." button
- select "Site"
- switch to the Advanced Tab
Define a site
name:
- in the Site Name,
enter a name
for your web
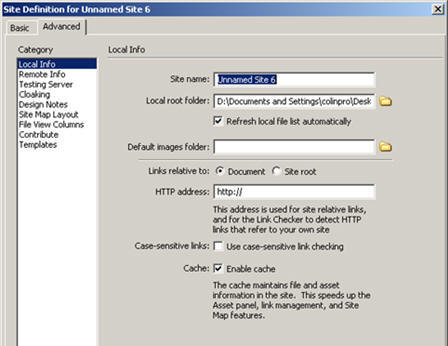
Locate your
installed web template
- click on the folder icon next to the 'Local root folder'
text field
- browse to c:/luckymarble/websites/
(click here to open folder)
- click on the Select button
You're now have access to your website to start the building process
- open the 'Templates' or 'Templates_webname' folder
- open the 'logo' page
To replace the 'Website
Name' graphic with text
- delete the logo graphic
- type your text into the page
- save and preview
The 'text' is formatted through the 'stylesheet.css' file in the styles
folder. For instructions on how to modify the 'font properties' please review
the Quick Start Guides 'case study' video (Section C / Part D / Chapter 3)
To replace the 'Website
Name' graphic with your own
graphic
- delete the graphic from the page
- drag your own graphic image onto the page
- save and preview
For best results:
- use a transparent PNG or
- use a square or rectangular JPG image
Gif images may produce a jagged edge when placed over the page background.
Results will vary.
For users wanting to create your own logo, you can use Macromedia Fireworks
MX 2004 or 8 to modify the 'Website Name' graphic. This graphic is saved as an
editable unflattened PNG. You can easily change the font, style, properties and
effects using Fireworks. Save and update your site in one action.
To modify the 'Website
Name' graphic using
Macromedia Fireworks:
- right click on the 'Website Name' graphic
- select Open With...
- select Fireworks MX 2004 or 8 from the list
- Fireworks will open the editable PNG graphic
- make your changes, click on the File menu and select SAVE
- preview a web page in your browser
-
open the Templates or ‘Templates_webname’ folder
-
open one of the following blank
template page layouts by double clicking on the page
in the folder list:
- compact.htm
- fullscreen.htm
- index.htm
- with the template open in the design window
- click on the File menu...
- click on Save As...
- give the page a new name (ex: page_name.htm)
**
when naming files for the web, such as web pages,
always use lower case, never use punctuation, and always use a hyphen ( - ) or
an underscore ( _ ) between two words or more:
bad example: Fruits
& Veggies 4 $$$.htm
good example same page:
fruits_and_vegatables_for_sale.htm
Tip, search engines will have an easier time listing your
pages if the page file name is relevant to the topic of the
page, and in 'legible' format.
- click on the "Change Title" button to give the new
page a title, or change this in the page properties
- click on Save
Your "
Folder List"
will display the new page, at the bottom of the list until you refresh. The
original page will still be in the ‘Templates or Templates_webname’ folder.
Removing a page:
INSTRUCTIONS:
-
locate the page you wish to remove in the folder list
-
right click and select delete from the
command menu
-
remember to remove this page from any navigation
elements
- top links
- icons
- vertical menu
- bottom links
Renaming a page:
INSTRUCTIONS:
** when naming files for the
web, such as web pages, always use lower case, never use punctuation, and always
use a hyphen ( - ) or an underscore ( _ ) between two words or more:
bad example: Fruits
& Veggies 4 $$$.htm
good example same page:
fruits_and_vegatables_for_sale.htm
Tip, search engines will have an easier time listing your pages if the page
file name is relevant to the topic of the page, and in 'legible' format.
- open the includes / Library folder
- open the icons page
- edit the text links as you would edit a regular text hyperlink
- save to update
- open the includes / Library folder
- open the top_links page
- edit the text links as you would edit a regular text hyperlink
- save to update
- open the includes / Library folder
-
open the 'vertical_menu' page
change the name
on the button
- double click on the text on the button to
activate text edit mode
- type in the new name for the button
change the
hyperlink on a button
-
right click on a text on the button
-
select Hyperlink Properties
-
(FrontPage): browse to the page you will be
linking to and click to select this page as the new
hyperlink
-
(Dreamweaver): use the hyperlink tool in the
Properties window, drag the page locator onto the page
you want to set the hyperlink too
-
(both):
or - type the name of the page into the 'Address' text
field
-
click OK once a new page has been selected
add a new button
** in many cases, you'll
want add a new button in between two existing buttons, this is the example we'll
use
-
place your cursor at the end of an
existing line of button text
-
press enter on your keyboard to create a
new 'blank' space
-
in the blank space type a name for your new
button
-
select the text for the new button (all
text)
-
right click, selecting HYPERLINK properties
-
(FrontPage): browse to the page you will be
linking to and click to select this page as the new
hyperlink
-
(Dreamweaver): use the hyperlink tool in the
Properties window, drag the page locator onto the page
you want to set the hyperlink too
-
(both):
or - type the name of the page into the 'Address' text
field
- click OK
You will see your new button added to the menu bar,
placed UNDER the button where you first placed your cursor. Seeing this in
action, you can now add more buttons and create a new order for your buttons.
**NOTE** you can modify the
appearance of the text for the menu buttons directly on the include page, but we
recommend editing the style sheet if you want to do this. More information can
be found in the Case Study Video of the Quick Start Guide.
remove a button
- select the button name with your cursor
- press backspace on your keyboard TWICE
- open the includes / Library folder
- open the bottom_links page
- edit the text links as you would edit a regular text
hyperlink
- save to update
- open the includes / Library folder
- open the site_info page
- edit the text as you would edit a regular text
- save to update
- preview in browser
- if you add additional lines of text to the site info page, this may
'skew' the bottom of the web page. preview in browser to find out if the
text your added to the site info include or Library page has altered the
bottom of the web pa
- open the flash folder
- open the taglines folder
- open the taglines.txt file
- edit the text between the " = " and the " & "
- DO NOT DELETE the equal sign
( = ) or the ampersand ( & )
- characters are limited so test it out in an actual web browser when
complete
- open the flash folder
- open the flash-images folder
- you'll see 4 images named:
- flash-image1.jpg
- flash-image2.jpg
- flash-image3.jpg
- flash-image4.jpg
- replace these images with new images using the
exact same file name (all lower case
including the
.jpg extension)
- use NON Progressive .jpg images (these settings are
located in your graphic editors export settings
- use images of the same size if possible, or larger
- to determine the size (dimensions) of the
replacement images:
- create a new blank page
- drag flash-image1.jpg onto the page
- double click on the image to activate the properties window
- look for the 'width' and 'height'
properties of this image
- create your replacements using the same dimensions
- save your replacement images to the flash /
flash-images folder to over write the existing pics
- create a new 24bit Transparent PNG image in your
favorite graphic editor, or download an image from an online resoucre
- scale the image to approximately the
save height and width as the image included in the template
- save the replacement image as 'themed-image.png'
- open the flash folder
- open the 'themed-image' folder
- drag or import your new 'themed -image.png'
file into this folder to replace the exiting file
- exact sizing does not matter, your image will be rendered at the size
you created it at
- all pages including template pages will be updated
to remove the themed
image from the 'Template'
pages
- first, open the includes / Library folder
- open the 'themed_image' page
- delete the 'themed-image.png' from the page
- save
to remove the themed
image from the 'Index' page
- open the flash folder
- delete the 'themed-image.png' from the page
- find a replacement MP3 file
- rename the file as: music1.mp3
- open the
flash folder
- open the music folder
- drag or import this new music1.mp3 file into the
flash/music folder to
over write the existing file